When we first moved into our house back in December of 2017 the folks from our ISP came out the day we moved in. We hastily had them run the cable line up to a location in our living room. We were in the midst of unpacking and I put zero thought into where I wanted to put our networking gear and we ended up with our modem cabinet in our family room. This worked out fine for a while as we got by with a basic router from Netgear.
My office is up on the second floor and the wifi strength was passable for the occasional work from home days but it was really slow when it came to managing content on my NAS (which was down in the family room cabinet as well). Not to mention how ugly it was to have the router on the top of the cabinet in the corner of the family room.
My setup in the cabinet grew a little bit over time and I ended up with the following gear:
- Charter Cable Modem
- Netgear Nighthawk R6700
- Synology DS413j
- Intel NUC running plex
- Intel NUC running docker for fun docker things
- Raspberry Pi - Running Pi-hole
- APC - Battery backup
When Covid hit and we started working remote full time, I noticed that the router would drop the wifi and end up rebooting itself pretty regularly (Found this forum post showing the issue). This turned out to be really frustrating, especially when it manifested itself during video calls with clients and our team. Instead of replacing the router, I decided to fully upgrade and hard wire the house. When I brought this up with Amanda, she didn’t say no, so I took it as a yes.
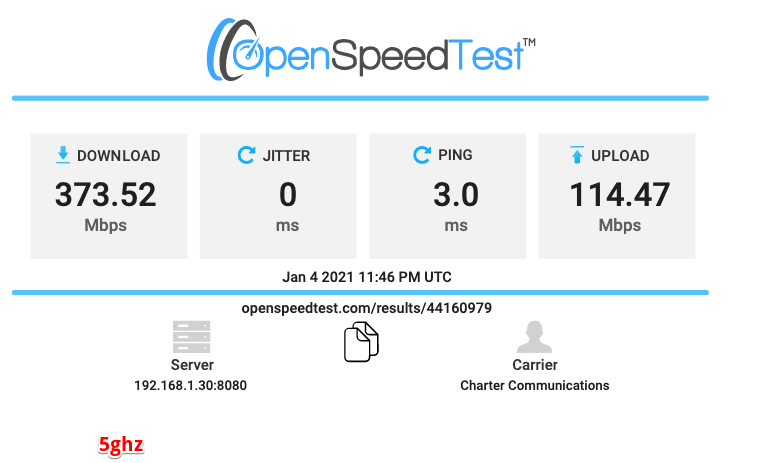
Just so we can see what I was working with, here is a speed test from my office running on the old router.

The speed test results above were run from a container on one of my NUCs.
I thought about my goals for the network and sketched out where I would ideally have drops throughout the house.
My main goal was to improve reliability and speed to my office and my entertainment devices. Additionally I wanted to make it possible to add things like IP security cameras and possibly HDMI over ethernet to house our entertainment cabinet downstairs, etc. I ended up making a floor-plan of each level of the house and marking it up on my iPad.
I wound up with a list that looked like this:
Second Floor
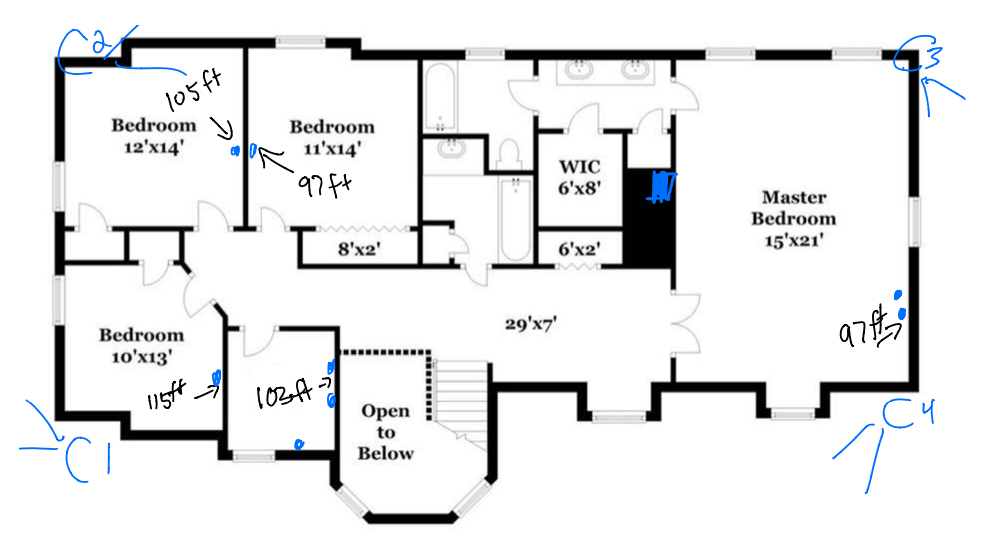
I wanted at least one run per room upstairs and settled on:
- Office: 5 drops (2 of 2 walls and 1 on another)
- Master Bedroom: 2 drops (TV + Roku on the wall)
- Guest Room: 1 drop (Roku)
- Bedroom 1: 1 drop (future)
- Bedroom 2: 1 drop (future)
- Cameras out of the attic: 4 Drops (each corner of the house)
- Hallway: 1 drop (access point)
This was a total of 15 runs to 2nd floor
First Floor
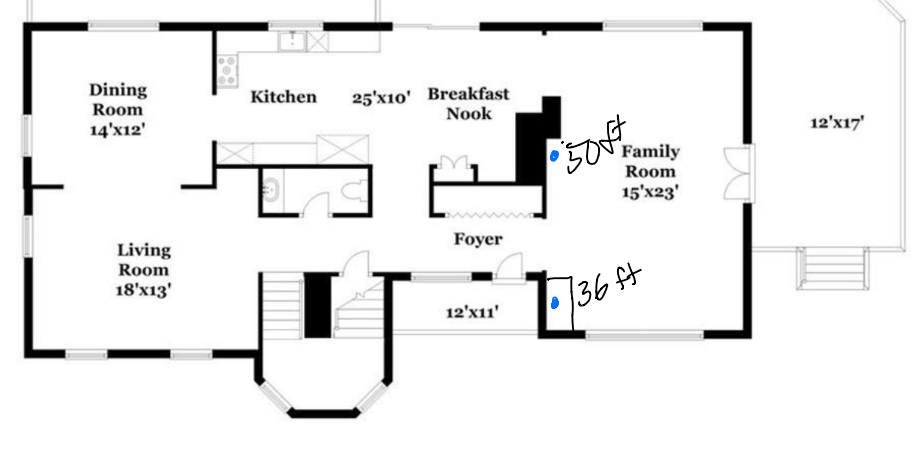
- Entertainment Cabinet: 4 drops
- TV Area: 4 drops (potentially to run HDMI over Ethernet in the future)
- Kitchen: 1 drop (Additional access point)
This was a total of 9 drops on the first floor
After figuring out exactly where the drops were going to go I could figure out exactly where I wanted them to start from. I knew that I didn’t want the equipment to stay in the living space so I scouted a spot in the basement under the stairs that wasn’t used for much. Only problem was that it was a concrete wall.
Once I knew the location, it was time to think about supplies!
For cable, one of my goals was a 10gig connection to the office. I know it can run over cat6 cable, as long as the run is short enough. By calculating the distance between floors, the distance from the “rack” and then the distance to the drop and back down the walls, I determined that my longest run was going to be 103 feet +/- a couple feet. This put me within the recommended 37-55 meter max distance for 10gig over cat 6.
Now I had to pick a cable to run.
The main things I needed to consider were:
Solid vs Stranded: I picked solid, since I was running it through walls and the cable wouldn’t move much once installed.
CM vs CMR vs CMP: I wound up with CMR, as it’s riser rated.
UTP vs FTP vs STP: I went with UTP (unshielded twisted pair). I’m not running it anywhere there would be a lot of EMI interference, and I made sure that if I was crossing an electrical line it was at 90 degrees. I also kept it at least 12" away when running parallel where possible.
References for your own research:
https://www.truecable.com/blogs/cable-academy/solid-vs-stranded-ethernet-cable
https://www.cmple.com/learn/learn-about-types-of-ethernet-cables-utp-ftp-and-stp-cable
https://community.fs.com/blog/ethernet-cable-jacket-ratings-cm-vs-cmr-vs-cmp.html
Using my map, I determined that for all of my runs I would need somewhere around 1600ft. So I decided to buy 2 1000ft boxes of blue cat6 cable.
Here is the list I ended up with from Monoprice:
| Item | Quantity | Cost | Total |
|---|---|---|---|
| Cat6 Cable (blue) - 1000ft | 2 | $101.96 | $203.92 |
| Keystones - toolless | 23 | $1.16 | $26.68 |
| Wall plate (1 hole) | 5 | $0.54 | $2.70 |
| Wall plate (2 hole) | 5 | $0.54 | $2.70 |
| Wall plate (4 hole) | 2 | $0.54 | $2.70 |
| 1-Gang low voltage moving bracket | 9 | $1.41 | $12.69 |
| 8" mountable zip tie (100) | 1 | $2.43 | $2.43 |
| Velcro ties | 1 | $1.49 | $1.49 |
| RJ45 plugs 100 pack | 1 | $9.49 | $9.49 |
Total Monoprice spend came to: $263.18
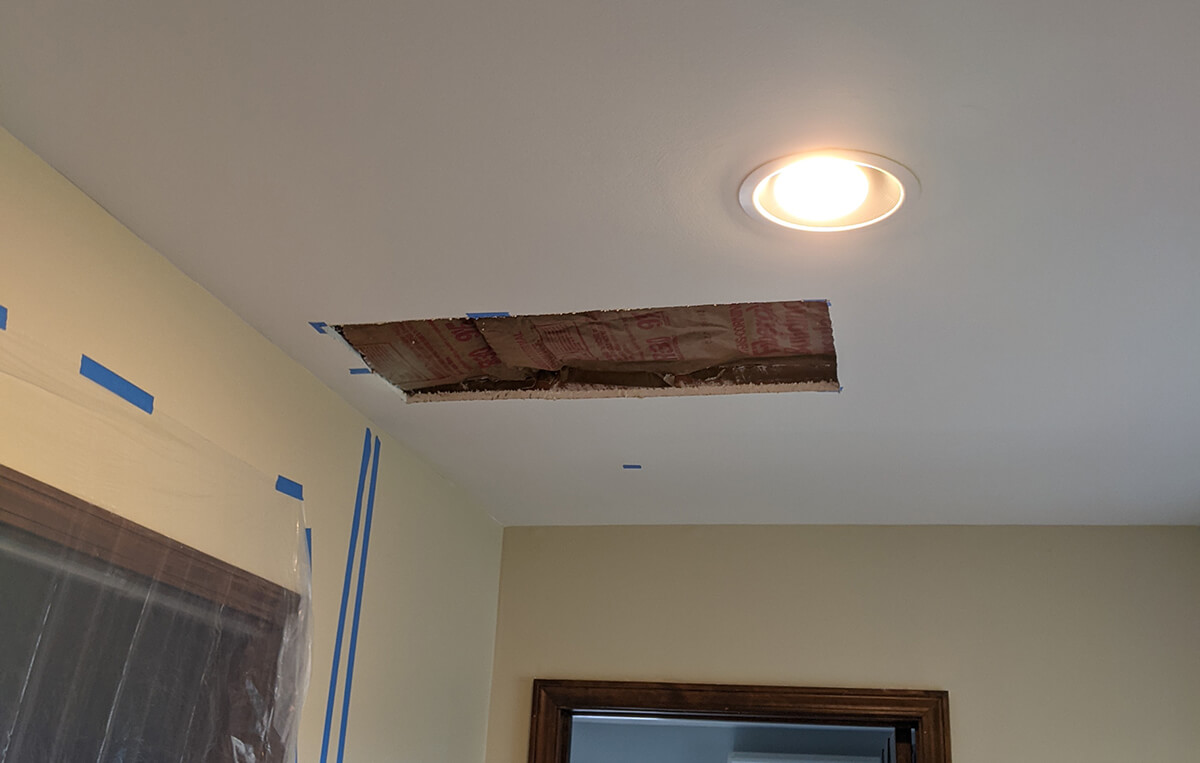
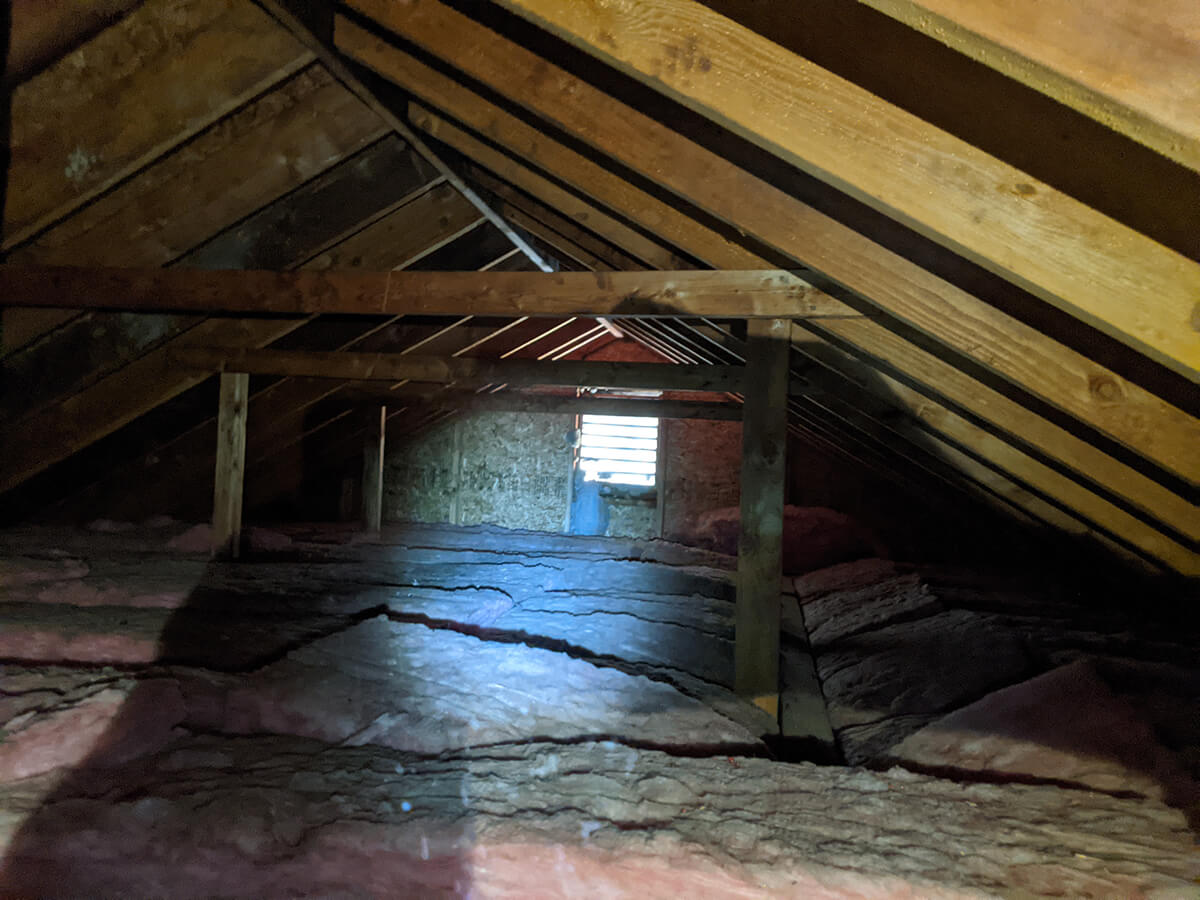
Now that I had the supplies coming it was time to figure out how we’re going to run everything up 2 floors to the attic. At this time I didn’t have access to the attic, so I was stressing a little bit about what I was going to find there. Before cutting a giant hole I ended up purchasing an inspection camera. I poked a hole through and got to the attic space. This camera didn’t actually tell me much as the focal length was quite short. It did help me determine that there was at least a couple feet of space between the sheetrock and the underside of the roof. I called that a success! I went ahead and cut an access hole so I could climb up and take a more official look.
We switched from an oil burning furnace to a propane furnace so that we could move the unit to the wall in the corner of the basement. Propane vents differently so we ended up with an empty cavity where the disconnected chimney piping is. I figured the old chimney location would be the best spot to go up. Once I got through, I was able to confirm that I could run some 2" PVC pipe through each floor and get to the basement. To do this I did have to cut a couple access holes in each floor next to the cavity in order to reach in and drill the holes, but once I had the hole in the ceiling I was able to use a plumb bob to get a perfectly straight line down to each floor. I used a 2 1/2" hole saw and made some room for the PVC. Since they were straight, I was able to insert each section of pipe and push it up as needed. I did have to cut them down from the 8ft lengths and couple them together as I pushed them up through the basement to each floor.
Once I had them up through the floors, I added some 2x4 bracing and some straps to secure the PVC both in the basement and in the attic.

While waiting for the Monoprice order to arrive, it was time to build the wall to secure the new 8U rack to. Since this wall is under the stairs, I had to angle the top plate to match the pitch of the stairs. The wall is constructed of 2x4’s and 3/4" plywood. I wanted to hide as many of the wires as possible so I left a couple holes below where the rack is mounted to tuck any excess wire into. To add to the install, the house previously had oil lines running through concrete in the corner. Since the tank was removed, I chiseled those out to let the new wall sit flush with the concrete.


Once the wall was in place, I ran a new 12/2 wire from the new rack wall through the basement and the garage ceiling to the electrical panel. I had an electrician hook the wire up to the panel and I have a new 20amp circuit dedicated to my electronics here. This would prevent the equipment from losing power when I constantly trip the basement circuit with my miter saw.
One thing I didn’t really think through when picking this location was the dust that falls through the cracks between the stairs. I will keep an eye on it and if it gets excessive, perhaps work on sealing them up better. In the same vein, I do some woodworking in the basement and I’m concerned about the woodworking dust as well. Time for a dust collector!
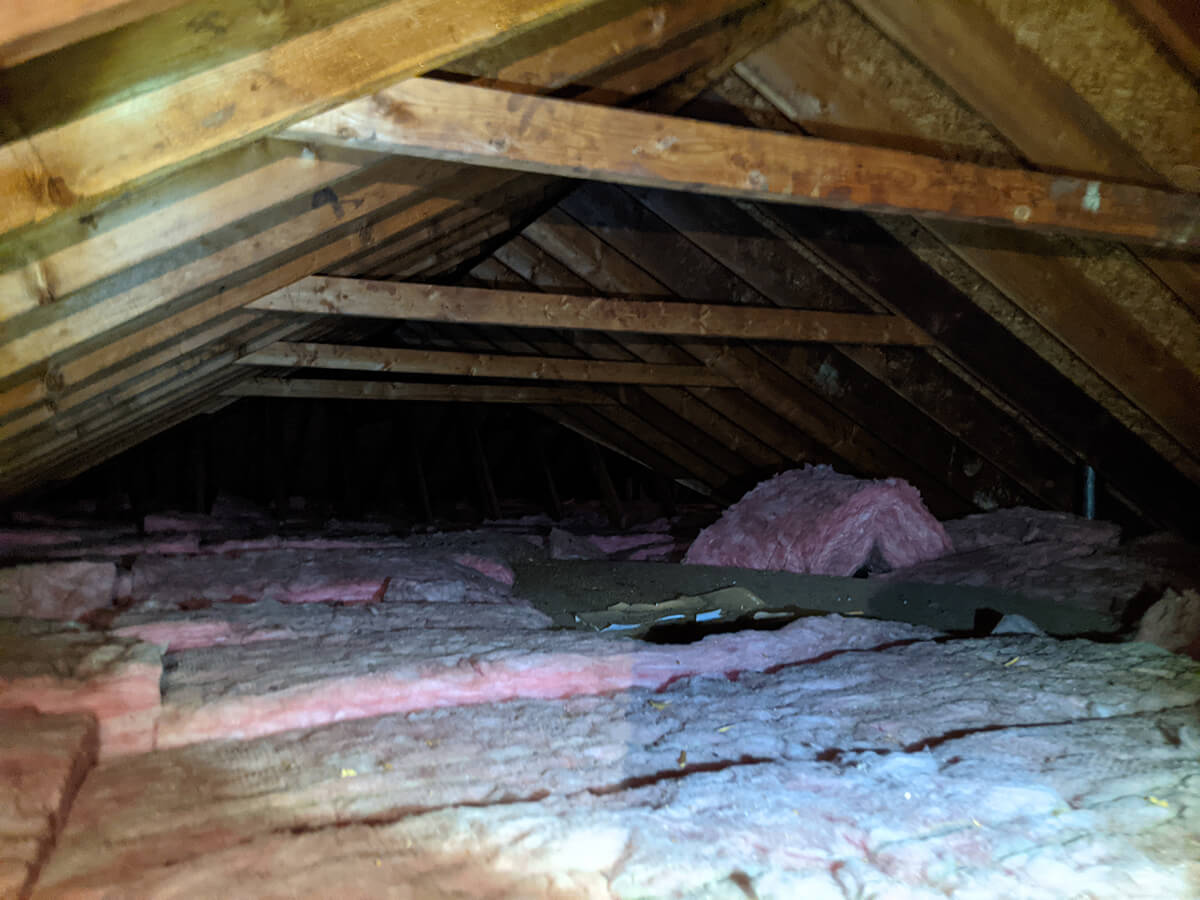
After building the wall, I set off creating a platform in the attic to move from one end of the house to the other. Since the attic was just open rafters and insulation, I decided to get some plywood and create a path to each end of the house. I cut them down into strips so they would fit through the hole and secured them to the top of the joists with screws. I made sure to grab some knee pads as crawling on this for hours was killer!

Once the ethernet cable arrived it was time to setup and get some runs going up to the attic. Since I ordered two boxes I was able to run two wires at a time. I started by heading into the attic and from the top of the PVC pipe I dropped some pull line (Klien 500ft line) down the pipe with some heavy washers attached.
Now that I had a the pull in from the attic to the basement, I setup a cart with the boxes facing up and grabbed some markers and post it notes. I ended up labeling each box and the end of each of the cables before pulling them. This let me label the other end of the cable before I cut it off. I attached the 2 ethernet cables and another run of pull line to the line that was already in the PVC using electrical tape. Having a second pull line attached makes it easier to run the next set of wires without fishing another line back down the opposite direction.

From the attic I pulled the first lines up, detached the pull line and then crawled to the drop location and pulled enough slack to get down the wall. Once the first line was run, I attached the cables to the underside of the roof rafters with zip ties. To keep it neat, I did this every other rafter, then alternated for the subsequent runs of cable. I made sure I had enough slack to run the cable back over to where the rack was mounted, labeled the other end of the line, cut it and fed it through the new wall and into the rack.

Once the first set of wires were up, I attached another pull string to to the one that was pulled up so I could pull it back down for the next set. This way I always had a pull string in the PVC.


It was hard to determine which stud bay I needed to drill the top plate in while in the attic. In order to determine this, I grabbed an old coat hanger and cut one end with an angle. Straightened it into a rod, I used it as a long drill bit in the corner of the ceiling from the room below. This gave me the exact stud bay and it made it much easier to patch than cutting additional holes in the sheetrock. After I had the top plate drilled, I dropped the line into the cavity. I would later grab the wires after cutting the holes and inserting the low voltage gang boxes.
If you are working on an outside wall, you’re going to likely run into insulation in the cavity. We ended up with fiberglass and in this case, once you drill the top plate, don’t shove the wire down. Grab a fish tape and send that down instead; it’s less likely to get caught on the fiberglass and all tangled in the wall. Then you can attach a pull line to the fish tape and use that to pull the ethernet from the attic.
I repeated this process for all of the runs until they were all complete.
I grabbed my drywall saw and cut the holes for the 1gang boxes at each location. I ended up ordering plates that could hold between 1 and 4 keystones based on the number of drops. I grabbed the wires from the wall cavity and terminated the cables into the keystone jacks at each location and moved back down into the basement.

Once all of the runs were complete, it was time to start setting up the rack. Here is a shot of all (or most) of the cables run to the new wall.

I stripped each of the wires and used a punch down tool to get them added to the patch panel. Once I had everything punched I used a label maker to keep everything neat. Here’s a progress picture most of the way through.

From there it was a matter of getting each of the cables tested, labeled and hooked up to my new (to me) switch.
After going a couple days with my existing router while I waited for my UDM Pro and access point to arrive I was able to get the Dream Machine installed in the rack. I added a shelf and a couple Intel NUCs that power a few docker containers.
I also took the opportunity to upgrade my Synology to a DS1621+. The rack was looking pretty good even though the NAS was temporarily on top.

In the picture above, you can see a power strip below that I ended up replacing with a dedicated UPS for the Synology that is wall mounted.
Now that we had everything fired up, I ran a couple more local speed tests.
Here is the 5ghz speed difference running off of the new access point:
And the whole reason for doing this, the speed test while wired:
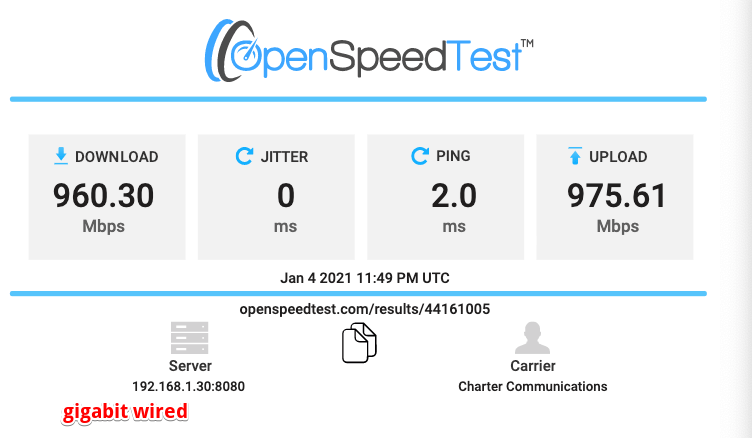
I’m really happy with the results and I think I’m setup pretty well to upgrade to 10g when I have devices in the house to support it (10g card in the Synology for example). I’m also looking forward to exploring HDMI over ethernet in the near term.
How much did the project cost? This may vary depending on the tools you have available and I’ve excluded the new equipment (UDM Pro, NanoHD, Synology and Cameras).
My total spend on the project came to $819.10. $285.74 at Monoprice and $533.36 at home depot on the various supplies and additional tools needed. The majority of which was the overpriced plywood needed to span the joists in the attic.
List of tools used
- Pull Sticks
- Tape Measure
- Fish Tape
- Electrical Tape
- Label Maker
- Klein Toolkit (purchased for project)
- Lan Explorer (purchased for project)
- Zip Ties
- Pulling Line (purchased for project)
- Drill
- Flexbit Auger
- Respirator
- Leatherman (not necessary but really handy when stuck in small spaces or far in the attic and you forget a pair of pliers or a knife)
- Lights
- Headlamp
- Kneepads (purchased for project)
- Inspection Camera (purchased for project)
- Screw Driver
- Velcro
- Ladder
- Holesaw (purchased for project)
- Spade bits (7/8")
- Metal Coat Hanger
Supplies from Home Depot
| Item | Quantity | Cost | Total |
|---|---|---|---|
| Trim casing (for the attic opening) | 1 | $60 | $60 |
| Sheetrock | 1 | $7.86 | $7.86 |
| Schedule 40 2" x 10FT PVC | 2 | $10.60 | $21.20 |
| 2" NM 2-Hole straps (used to secure PVC) | 1 | $3.25 | $3.25 |
| PVC Coupling | 2 | $1.25 | $2.50 |
| 3 1/8" Holesaw (1@16.97) - Wanted 2 7/8" or 3" | 1 | $16.97 | $16.97 |
| Klien 500ft pull line | 1 | $12.97 | $12.97 |
| Great stuff fire blocking foam | 1 | $7.25 | $7.25 |
| 3M P100 respirator cartridges (Already owned the respirator) | 1 | $19.97 | $19.97 |
| Plywood (4x8 sheets, cut into quarters for the attic) | 5 | $42.95 | $214.75 |
| Access Panel 14x14 (used to cover access holes) | 2 | $17.23 | $34.46 |
| Black cable ties 4" | 1 | $4.98 | $4.98 |
| 1 1/4" construction screws | 1 | $7.97 | $7.97 |
| Lan Explorer | 1 | $28.97 | $28.97 |
| Twisted Pair toolkit (Crimper, pushdown tool, jacket trimming tool) | 1 | $39.97 | $39.97 |